<< Android-Note
ホーム画面へのアプリのショートカットの作り方
ホーム画面にショートカットを作る方法を紹介します。
手順は簡単で次の2つです。
パーミッションの設定
プロジェクトのAndroidManifest.xmlを開きapplication要素の終了タグ以下に次のようなパーミッションを追加します。
    </application>

        <uses-permission android:name="com.android.launcher.permission.INSTALL_SHORTCUT" />
        <!--上の1行を追加-->
</manifest>
これでショートカット作成ができるようになります。
ショートカット作成をシステムに依頼する
ショートカットを作るときはアプリ単体では作ることができないので専用のインテントを呼び出します。
ここではボタンを押したらホーム画面上に"MyApp Shortcut"という名前のショートカットを作ることにします。
次がそのコードです。
public class MainActivity extends Activity
{
    public void onCreate(Bundle savedInstanceState)
    {
        super.onCreate(savedInstanceState);
        setContentView(R.layout.activity_main);


        Button makeShortcutButton
        = (Button)findViewById(R.id.make_shortcut_button);
            //ショートカット作成ボタン
        makeShortcutButton.setOnClickListener(new View.OnClickListener()
        {
            @Override
            public void onClick(View v)
            {
                String shortcutTitle = "MyApp Shortcut";
                    //ショートカットのタイトル
                Parcelable icon = Intent.ShortcutIconResource.fromContext(
                        MainActivity.this,
                        R.drawable.ic_launcher);
                    //ショートカットのアイコン

                /*ショートカットから起動するインテントの作成*/
                Intent shortcut_intent = new Intent(
                        Intent.ACTION_MAIN);
                shortcut_intent.setClassName(
                        MainActivity.this,
                        MainActivity.this.getClass().getName());

                Intent installIntent = new Intent(
                         "com.android.launcher.action.INSTALL_SHORTCUT");
                    //ショートカットを作るためのインテント
                installIntent.putExtra(
                        Intent.EXTRA_SHORTCUT_INTENT, shortcut_intent);

                /*ショートカットのアイコンとタイトルを設定*/
                installIntent.putExtra(
                        Intent.EXTRA_SHORTCUT_ICON_RESOURCE, icon);
                installIntent.putExtra(
                        Intent.EXTRA_SHORTCUT_NAME, shortcutTitle);

                MainActivity.this.sendBroadcast(installIntent);
                    //システムにショートカット作成を依頼する。
            }
        });
    }
}
ここでは自分自身(MainActivity)を起動させるようなショートカットを作っています。
次の1行でショートカットを作成するインテントを作成します。
Intent installIntent = new Intent("com.android.launcher.action.INSTALL_SHORTCUT");
このインテントに作成したいショートカットの情報(タイトルや画像など)を渡して作成を依頼します。
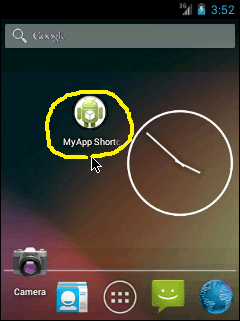
作成したショートカットは次のようになりました。(黄色線内側が作成したショートカット)
ちなみに、同じ名前のショートカットは複数作成できないので注意が必要です。
起動するショートカットに値を渡す
通常のインテントの起動と同様にショートカットの起動時の値を渡すこともできます。
例えばショートカットのインテントにint型の変数を渡すには次のようなコードが書けます。
String shortcut_title = "MyApp Shortcut";
    //ショートカットのタイトル
Parcelable icon = Intent.ShortcutIconResource.fromContext(
        MainActivity.this,
        R.drawable.ic_launcher);
    //ショートカットのアイコン

/*ショートカットから起動するインテントの作成*/
Intent shortcut_intent = new Intent(Intent.ACTION_MAIN);
shortcut_intent.setClassName(MainActivity.this,
        MainActivity.this.getClass().getName());
shortcut_intent.putExtra("MYAPP_INT_KEY", 1);
    //キー("MYAPP_INT_KEY")と値を渡す。
putExtraメソッドで渡したい型を指定できます。
ショートカット起動時にはgetIntExtraなどの渡した型に合うメソッドを使って値を取り出せます。
以上、ショートカットの作り方でした。では、また!
© Kaz