ホーム画面へのウィジェット設置方法まとめ
ウィジェットとは普通のアプリと違い、他のアプリ(ホーム画面やロック画面)で動くアプリのことです。
ウィジェットの代表例としては時計や音楽プレイヤーなどが挙げられます。
ここでは簡易的な時計ウィジェットを例にして、作り方を簡単にまとめてみました。
ウィジェットレイアウトの作成
ウィジェットにも普通のアプリ同様、レイアウトがある必要があります。この時、レイアウトに使用できるウィジェットには制限があり、次のレイアウトクラスとウィジェットクラスしか利用できません。
FrameLayout, LinearLayout, RelativeLayout, GridLayout, AnlogClock, Button,
Chronometer, ImageButton, ImageView, ProgressBar, TextView, ViewFlipper,
ListView, GridView, StackView, AdapterViewFlipper
この制限を守ったうえでここではclock_widget.xmlという名前で次のようなレイアウトを作成します。
<?xml version="1.0"encoding="utf-8"?>
<LinearLayout xmlns:android="http://schemas.android.com/apk/res/android"
    android:layout_width="match_parent"
    android:layout_height="match_parent"
    android:orientation="vertical"
    android:padding="@dimen/widget_padding">

    <TextView
        android:id="@+id/clockTextView"
        android:layout_width="match_parent"
        android:layout_height="match_parent"/>

</LinearLayout>
上のレイアウトでwidget_paddingという定数がありますが、これはres/values/dimens.xmlとres/values-v14/dimens.xmlの両方で定義している値でそれぞれ次ように定義されています。
res/values/dimens.xml
<resources>
    <dimen name="widget_padding">8dp</dimen>
</resources>
res/values-v14/dimens.xml
<resources>
    <dimen name="widget_padding">0dp</dimen>
</resources>
values-v14でなぜパディングを0にしているかというとAndroid4.0以上ではウィジェットのパディングを自動調節してくれるからです。
AppWidgetProviderの作成
次にウィジェットの更新を行う、AppWidgetProviderを拡張します。
public class ClockWidgetProvider extends AppWidgetProvider
{
	@Override
    public void onUpdate(Context context, AppWidgetManager appWidgetManager,
    					int[] appWidgetIds)
	{
        for(int widgetId : appWidgetIds){
        	/** 日付をテキストビューに表示*/
        	SimpleDateFormat sdf = new SimpleDateFormat("yyyy/MM/dd HH:mm:ss");
        	String dateStr = sdf.format(new Date());
        	RemoteViews remoteViews = new RemoteViews(context.getPackageName(),
                    R.layout.clock_widget);
            remoteViews.setTextViewText(R.id.clockTextView, dateStr);

            /** ウィジェットのアップデート */
            Intent intent = new Intent(context, ClockWidgetProvider.class);
            intent.setAction(AppWidgetManager.ACTION_APPWIDGET_UPDATE);
            intent.putExtra(
            		AppWidgetManager.EXTRA_APPWIDGET_IDS, appWidgetIds);
            PendingIntent pendingIntent = PendingIntent.getBroadcast(context,
                    0, intent, PendingIntent.FLAG_UPDATE_CURRENT);
            remoteViews.setOnClickPendingIntent(
            		R.id.clockTextView, pendingIntent);
            appWidgetManager.updateAppWidget(widgetId, remoteViews);
        }
	}
}
onUpdateメソッドで現在ホーム画面にあるすべてのウィジェットをIDを通して更新できます。
ここではウィジェットのTextViewに現在の時刻を表示して、その後更新しているだけです。
AppWidgetProviderのメタデータの作成
次にAppWidgetProviderで更新するウィジェットの大きさ、更新頻度、レイアウトなどのメタデータを定義します。
メタデータはres/xmlフォルダ以下に作ります。ここでは、clock_widget_info.xmlという名前で次のファイルを作成しました。
<?xml version="1.0"encoding="utf-8"?>
<appwidget-provider xmlns:android="http://schemas.android.com/apk/res/android"
    android:minWidth="120dp"
    android:minHeight="60dp"
    android:updatePeriodMillis="1000"
    android:initialLayout="@layout/alarm_note_widget"
    android:resizeMode="horizontal|vertical"
    android:widgetCategory="home_screen|keyguard"
    android:previewImage="@drawable/ic_launcher">
</appwidget-provider>
AndroidManifest.xmlの設定
最後にAndroidManifest.xmlを開き、applciationタグ以下にAppWidgetProviderの宣言をしておきます。
        <receiver android:name=".ClockWidgetProvider">
            <intent-filter>
                <action android:name="android.appwidget.action.APPWIDGET_UPDATE"/>
            </intent-filter>
            <meta-data android:name="android.appwidget.provider"
                android:resource="@xml/clock_widget_info"/>
        </receiver>
実際にウィジェットをホーム画面などにおいてみると次のように時刻を表示するウィジェットが出来上がります。
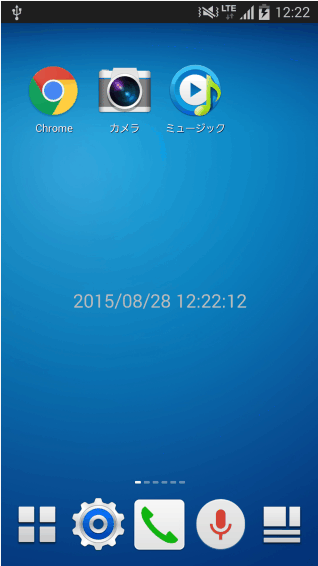
ウィジェットの更新間隔は30分に1度と決まっているので、1度時刻を更新すると30分後まで時刻が更新されません。これでは時計とは呼べないので、Serviceなどを使って定期的にウィジェットを更新するなどの対策が必要です。
以上が簡易的なウィジェットの作り方です。お疲れ様でした。