<< Android-Note
ダイアログ(AlertDialog)の作成
ダイアログの作成には大抵AlertDialogクラスを使います。
作成方法にはレイアウトファイルを使う方法と使わない方法の2種類があります。
レイアウトからダイアログ作成
まず、ダイアログに表示したいレイアウト(ここではmy_dialog.xml)を次のように作ります。
<?xml version="1.0" encoding="utf-8" ?>
<LinearLayout xmlns:android="http://schemas.android.com/apk/res/android"
    android:layout_width="match_parent"
    android:layout_height="match_parent"
    android:orientation="vertical" >

    <TextView
        android:id="@+id/make_grp_timer_text"
        android:layout_width="match_parent"
        android:layout_height="wrap_content"
        android:text="@string/make_timers_msg" />

    <EditText
        android:id="@+id/timers_name_edit_text"
        android:layout_width="match_parent"
        android:layout_height="wrap_content"
        android:inputType="text"
        android:singleLine="true" />

</LinearLayout>
このレイアウトファイルではテキストビューとエディットテキストの2つを配置しています。次にコード中からダイアログを呼び出します。コードは以下のようになります。
package com.MyApp.myapp;

import android.os.Bundle;
import android.app.AlertDialog;
import android.content.DialogInterface;
import android.view.LayoutInflater;

public class MainActivity extends Activity
{

    public void onCreate(Bundle savedInstanceState)
    {
        super.onCreate(savedInstanceState);
        setContentView(R.layout.activity_main);

        showMyDialog();
    }

    //ダイアログを作る。
    public void showMyDialog()
    {
        AlertDialog.Builder builder = new AlertDialog.Builder(this);
        LayoutInflater inflater = LayoutInflater.from(this);
        final View dialog_view = inflater.inflate(R.layout.my_dialog, null);
            //レイアウトファイルからビューを取得

        //レイアウト、題名、OKボタンとキャンセルボタンをつけてダイアログ作成
        builder.setView(dialog_view)
            .setTitle("タイトル")
            .setPositiveButton("OK",
            new DialogInterface.OnClickListener()
            {
                @Override
                public void onClick(DialogInterface dialog, int which) {
                    /*OKのときの処理内容*/
                }
            })
            .setNegativeButton("キャンセル", new DialogInterface.OnClickListener() {
                @Override
                public void onClick(DialogInterface dialog, int which)
                {
                    /*キャンセルされたときの処理*/
                }
            });

        AlertDialog myDialog = builder.create();
        myDialog.setCanceledOnTouchOutside(false);
            //ダイアログ画面外をタッチされても消えないようにする。
        myDialog.show();
            //ダイアログ表示
    }

}
ダイアログを作るときにはAlertDialog.builderクラスが使われます。
LayoutInflaterクラスによりレイアウトファイルからビューを取得し、それをビルダーのsetView関数からダイアログに設置しています。
その後、setTitleやsetPositiveButtonメソッドのようにダイアログにレイアウト以外のタイトルやボタンをつけることができます。
今回のコードでは次のようなダイアログが出来上がります。
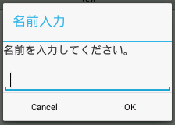
このように中央にレイアウトファイルの内容が表示され、上にタイトル、下にボタンが配置されます。
レイアウトなしでダイアログ作成
次にレイアウトなしでダイアログを作る方法を紹介します。
作り方は次のようにレイアウトファイルから作る場合とほとんど変わりません。
showDialogの内容public void showDialog() { AlertDialog.Builder builder = new AlertDialog.Builder(this); EditText edit_text = new EditText(this); //エディットテキスト、題名、OKボタンとキャンセルボタンをつけてダイアログ作成 builder.setView(edit_text) .setTitle("タイトル") .setPositiveButton("OK", new DialogInterface.OnClickListener() { @Override public void onClick(DialogInterface dialog, int which) { //OKが押されたときの処理 } }) .setNegativeButton("キャンセル", new DialogInterface.OnClickListener() { @Override public void onClick(DialogInterface dialog, int which) { //キャンセルされたときの処理 } }); AlertDialog myDialog = builder.create(); myDialog.setCanceledOnTouchOutside(false); //ダイアログ画面外をタッチされても消えないようにする。 myDialog.show(); //ダイアログ表示 }
レイアウトファイルから作る場合と違う点はEditTextをその場でインスタンス化し、setViewに渡している点です。
それによってEditTextがトップウィジェットのダイアログになります。
もちろん、LinearLayoutなどのレイアウトクラスも渡すことが可能です。
© Kaz