<< Android-Note
リストビューの区切り線のカスタマイズ
ListView(リストビュー)の区切り線はアイテム同士のちょうど中間に位置するように配置されます。
なので、上のアイテムに下線を引いて、下のアイテムの間との間隔をあけるようなレイアウトはできません。
その代わりの方法としてアイテム自身に下線を引く方法があります。手順は次の通りです。
下線の作成
アイテムの下線は例えば次のseparator.xmlのような作り方をします。
<layer-list xmlns:android="http://schemas.android.com/apk/res/android" >
    <item
        android:bottom="1dp"
        android:left="-2dp"
        android:right="-2dp"
        android:top="-2dp" >
        <shape android:shape="rectangle" >

            <stroke
                android:width="2dp"
                android:color="#FFFF0000" />
            <solid android:color="#00FFFFFF" />
        </shape>
    </item>
</layer-list>
itemタグで描画する図形の座標を設定しますが、左右上の線座標をマイナスにすることで指定した座標分だけ表示されなくなります。
そこにstrokeタグで2dpの赤色の線を作っています。
下部分の座標だけ1dpあるので下部分のみが描画され、2dpの下線ができます。
アイテムに下線を設置する
作成した下線をリストビューに表示するアイテムのレイアウトファイル(list_data.xmlなど)に設置します。
アイテムのbackgroundプロパティに作成した下線を次のように渡します。
<LinearLayout xmlns:android="http://schemas.android.com/apk/res/android"
    android:layout_width="match_parent"
    android:layout_height="match_parent"
    android:background="@drawable/separator"
    android:orientation="horizontal" >
        <!--android:backgroundに区切り線のリソースを渡す-->
    <ImageView
        android:id="@+id/list_image_view_u"
        android:layout_width="wrap_content"
        android:layout_height="wrap_content" />

    <TextView
        android:id="@+id/list_text"
        android:layout_width="wrap_content"
        android:layout_height="wrap_content" />
</LinearLayout>
ここではLinearLayoutがアイテムのトップにあるビューなのでそれに下線のレイアウトを渡します。
この時点でリストビューは次のように表示されました。
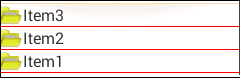
下線は引かれていますが、アイテムの間隔が狭くなっています。
アイテム間隔の調整
最後にアイテム間の間隔を調節します。
既にアイテムに下線が引いてあるのでもともとあった区切り線を透明にし、それをアイテム間の空白として使います。
リストビューのレイアウトは次のようになります。
<?xml version="1.0" encoding="utf-8" ?>
<LinearLayout xmlns:android="http://schemas.android.com/apk/res/android"
    android:id="@+id/list_view_container"
    android:layout_width="match_parent"
    android:layout_height="match_parent"
    android:orientation="vertical" >

        <ListView
            android:id="@+id/list_view"
            android:layout_width="match_parent"
            android:layout_height="match_parent"
            android:divider="#00000000"
            android:dividerHeight="7dp" >
        </ListView>
</LinearLayout>
重要なのは次の2行です。
            android:divider="#00000000"
            android:dividerHeight="7dp"
ここで区切り線を透明にし高さを7dpにします。この高さがアイテム間の空白の大きさになります。
この設定をしたリストビューは次のように表示されます。
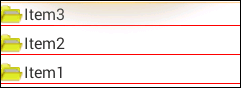
アイテムとアイテムの間が空いているのが分かります。
© Kaz