カスタムリストビューの作り方
ListViewはArrayAdapterを使えば自分で自由にカスタマイズすることができます。その手順をここでは紹介します
アイテムのレイアウト
まず初めにリストビューのアイテムのレイアウトファイルから作成します。
例えば、テキストビュー1つと画像ボタン1つをもつアイテムを作りたい場合は次のようなレイアウトをres/layoutに作成します。
<?xml version="1.0" encoding="utf-8" ?>
<LinearLayout xmlns:android="http://schemas.android.com/apk/res/android"
    android:layout_width="match_parent"
    android:layout_height="match_parent"
    android:gravity="center_horizontal"
    android:orientation="vertical" >

    <TextView
        android:id="@+id/listTextView"
        android:layout_width="wrap_content"
        android:layout_height="wrap_content" />

    <ImageButton
        android:id="@+id/listImageButton"
        android:layout_width="wrap_content"
        android:layout_height="wrap_content"
        android:src="@drawable/item_image" />

</LinearLayout>
アイテムの持つデータクラスの作成
リストビューにアイテムを設置したときにそのアイテムの持つ情報を保持するクラスを作ります。
アイテムの持つ情報は作りたいリストによって変わりますが、ここではテキストビューの内容を保持するクラスを次のように作ります。
package com.MyApp.myapp;

public class CustomListData
{
    private String textData;
        //リストビューの1つのアイテムのテキスト
    private Bitmap imgData;

    public void setTextData(String textData)
    {
        this.textData = textData;
    }
    public String getTextData()
    {
        return textData;
    }

    public void setImageData(Bitmap imgData)
    {
        this.imgData = imgData;
    }
    public void setImageData(Bitmap imgData)
    {
        return imgData;
    }
}
この例ではテキストと画像の両方をアイテムに持つようなリストビューを作りたいので2つのデータ(String型の文字列とBitmap型の画像)を持つデータクラスを作っています。
なぜこのようなデータクラスを作成するかというとリストビューのアイテムの情報を取得したり設定するためです。
独自のアダプタークラスの作成
次にリストビューに設定したいアダプタークラスをArrayAdapterクラスを拡張して作ります。
この例では次のようなアダプタークラスを作りました。
package com.MyApp.myapp;

import java.util.List;

import android.content.Context;
import android.view.LayoutInflater;
import android.view.View;
import android.view.ViewGroup;
import android.widget.ArrayAdapter;

public class MyListArrayAdapter extends ArrayAdapter<CustomListData>
{
    private Context context;
    private LayoutInflater inflater;
    private int listDataLayoutId, listTextId, imageButtonId;

    public MyListArrayAdapter(Context context, int resource,
            List<CustomListData> objects, int listItemLayoutid,
            int textViewId, int imageButtonId) {
        super(context, resource, objects);

        this.context = context;
        inflater = (LayoutInflater) context.getSystemService(Context.LAYOUT_INFLATER_SERVICE);
        this.listItemLayoutId = listItemLayoutid;
        this.textViewId = textViewId;
        this.imageButtonId = imageButtonId;
    }

    public View getView(int position, View convertView, ViewGroup parent)
    {
        if(convertView == null){
            convertView = inflater.inflate(listItemLayoutId, null);
        }

        CustomListData item = this.getItem(position);
            //リストのアイテムデータの取得

        TextView textView = (TextView)convertView.findViewById(textViewId);
        if(textView != null){
            textView.setText(item.getTextData());
                //アイテムデータに設定されたテキストを表示
        }

        ImageButton imageButton = (ImageButton)convertView.findViewById(imageButtonId);
        imageButton.setOnClickListener(new View.onClickListener(){
            public void onClick(View arg0){
                /*ボタンがクリックされたときの処理*/
            }
        );

        return convertView;
            //生成したアイテムのビューを返す。
    }
}
このアダプタークラスではアイテムのビューを作成しています。
このコード内でアイテムデータ(CustomListData)から情報を取得しているのが次のコードです。
        CustomListData item = this.getItem(position);
            //リストのアイテムデータの取得

        TextView textView = (TextView)convertView.findViewById(textViewId);
        if(textView != null){
            textView.setText(item.getTextData());
                //アイテムデータに設定されたテキストを表示
        }
getItemメソッドからアイテムのデータクラスのインスタンスを取得し、そこから必要なデータをテキストビューなどに設定してあげます。
カスタムリストビューの表示
最後にカスタムしたアダプタークラスをリストビューに設定します。
この例のコードは次のようになります。
package com.MyApp.myapp;

import java.util.ArrayList;

import com.MyApp.myapp.MyListArrayAdapter;

public class MainActivity extends Activity
{

    MyListArrayAdapter listAdapter = null;

    protected void onCreate(Bundle savedInstanceState)
    {
        super.onCreate(savedInstanceState);
        setContentView(R.layout.activity_main);

        final ListView listView = (ListView)findViewById(R.id.listView);
        if(listAdapter != null){
            /*リストのアイテムを5つ作る*/
            List<CustomListData> objects = new ArrayList<CustomListData>();
            for(int i = 0; i < 5; ++i){
                CustomListData itemData = new CustomListData();
                itemData.setImageData(
                        Bitmap.BitmapFactory.decodeResource(getResources(), R.drawable.item_image));
                objects.add(itemData);
            }

            listAdapter = new MyListArrayAdapter(this, 0, objects,
                                    R.layout.listData, R.id.listTextView,
                                    R.id.listImageButton);
                //レイアウトファイルとテキストビューと画像ボタンのIDを渡してアダプター作成
            listView.setAdapter(listAdapter);
                //リストビューにアダプターを設定
        }else{
            /*既にアダプターが作られているならそのまま設定する。*/
            listView.setAdapter(listAdapter);
        }
    }
}
ここでは5つのアイテムを持つアダプタークラスを作り、それをリストビューに設定しています。
アダプターを作っているのが次のコードです。
            listAdapter = new ArrayAdapter(this, 0, objects,
                                    R.layout.listItemData, R.id.listTextView,
                                    R.id.listImageView);
先ほど作ったArratAdapterにレイアウトファイルとアイテム内にあるビューのIDなどと一緒にアイテムデータを渡しています。
これでカスタムリストビューの完成です。
この例では次のようなカスタムリストが表示されました。
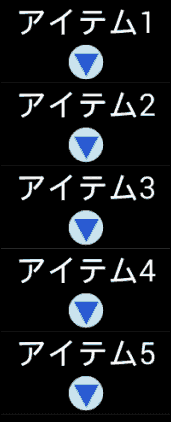
テキストビューとボタンが1組で1つのアイテムとして表示されています。