アプリ通知(Notification)のカスタマイズ
アプリ通知(Notification)は独自のレイアウトを作ってボタンやテキストを自由に配置することが可能です。手順は大まかにいうと次のようになります。
アプリ通知のレイアウトの作成
例えば左側に画像が1つ、右側にテキストビューとボタンが縦並びになっている次のようなレイアウト(custom_notification.xml)を作ります。
custom_notification.xml
<?xml version="1.0" encoding="utf-8" ?>
<LinearLayout xmlns:android="http://schemas.android.com/apk/res/android"
    android:layout_width="match_parent"
    android:layout_height="64dp"
    android:orientation="horizontal" >

    <ImageView
        android:id="@+id/ntf_icon_img_view"
        android:layout_width="wrap_content"
        android:layout_height="wrap_content"
        android:layout_gravity="center_vertical" />

    <LinearLayout
        android:layout_width="match_parent"
        android:layout_height="match_parent"
        android:orientation="vertical" >

        <TextView
            android:id="@+id/ntf_title_text"
            android:layout_width="match_parent"
            android:layout_height="wrap_content"
            android:textSize="18sp" />

        <Button
            android:id="@+id/ntf_button"
            android:layout_width="wrap_content"
            android:layout_height="wrap_content"
            android:textSize="18sp" />

    </LinearLayout>

</LinearLayout>
アプリ通知をカスタマイズするときには普通のビューなら0dpから64dpの範囲内で高さが制限されています。ここでは限界の64dpを高さに設定しています。
ただし、ListViewなどの複数の項目を持つビューに限っては高さは256dpまで拡張することができるようです。
アプリ側で通知をカスタマイズする
レイアウトを作った後はアプリ側のActivityやServiceクラスで次のようにRemoteViewsクラスを使って実際に通知に表示するビューを表示します。
public class MainActivity extends Activity
{

    @Override
    protected void onCreate(Bundle savedInstanceState)
    {
        super.onCreate(savedInstanceState);
        setContentView(R.layout.activity_main);
        RemoteViews ntfViews = new RemoteViews(getPackageName(), R.layout.custom_notification);
            //レイアウトファイルからRemoteViewsを生成
        ntfViews.setTextViewText(R.id.ntf_title_text, "Custom Notification");
        ntfViews.setImageViewResource(R.id.ntf_icon_img_view, R.drawable.mail);
        Intent intent = new Intent(getApplicationContext(), MainActivity.class);
            //ボタンが押されたら起動するインテント
        PendingIntent subIntent = PendingIntent.getActivity(this, 0, update_intent,
                                                PendingIntent.FLAG_UPDATE_CURRENT);
        ntfViews.setTextViewText(R.id.ntf_button, "Click Button!!");
        ntfViews.setOnClickPendingIntent(R.id.ntf_button, subIntent);
            //ボタンにインテント起動の機能を持たせる

        NotificationCompat.Builder nfb
        = new NotificationCompat.Builder(getApplicationContext())
                .setContentIntent(null)
                .setContent(ntfViews)
                .setSmallIcon(R.drawable.mail);
        NotificationManager nfm = (NotificationManager) getSystemService(NOTIFICATION_SERVICE);
        nfm.notify(CONFIG_NOTIFICATION, nfb.getNotification());
            //アプリ通知を表示
    }

}
この例では次のようなアプリ通知がステータスバーに表示されます。
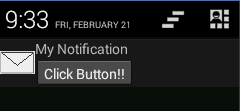
ボタンを押したときだけ指定したアクティビティが起動します。setContentIntentメソッドにはnullを渡してあるのでボタン以外の場所を押しても何も起動しません。
カスタマイズの限界
RemoteViewsに設置できるビューには制限があります。それが次のような制限です。
- 設置することのできないビューがある。
- ビューにリスナーを設定することができない。
1つめの設置することのできるビューについてはCreating App Widget Layoutに設置できるビューの一覧が載っています。この一覧にあるビュー以外はアプリ通知に使うことはできないので注意が必要です。
また2つめはRemoteViewsからビュー自体のインスタンスを取得できないため、ビューはインテントを起動する以外の目的には使えないという意味です。ただし、ビューの移動や削除なら可能です。
もっとRemoteViewsについて詳しく知りたい場合はRemoteViewsのリファレンスが参考になります。